
Guide
Laser cut slots too loose or too tight? Fix the fit
Slot-together kit rattles or jams? Read which joints are off, measure the real sheet thickness, save the parts you cut and fix the next cut.
Updated 10 Nov 2026 · By the MocMakes team
A maker on the LightBurn forum cut a set of slot-together houses he had bought and found "the cuts are very loose". A few posts later came the odd part: the same files, cut a few weeks earlier, had been too tight to push together. Same files, same laser, opposite problem.
That is how this problem usually looks. A slot joint fits only when three things agree: the real thickness of your sheet, the slot width the designer drew, and the width your beam burns away (the kerf). Of those three, the file is the one that does not change between cuts, so check the other two first.
MocMakes makes the free test bar and Slot Fit Adjuster linked on this page and sells slot-together kits. Forum quotes are linked under Sources; menu names come from the software's own help pages.
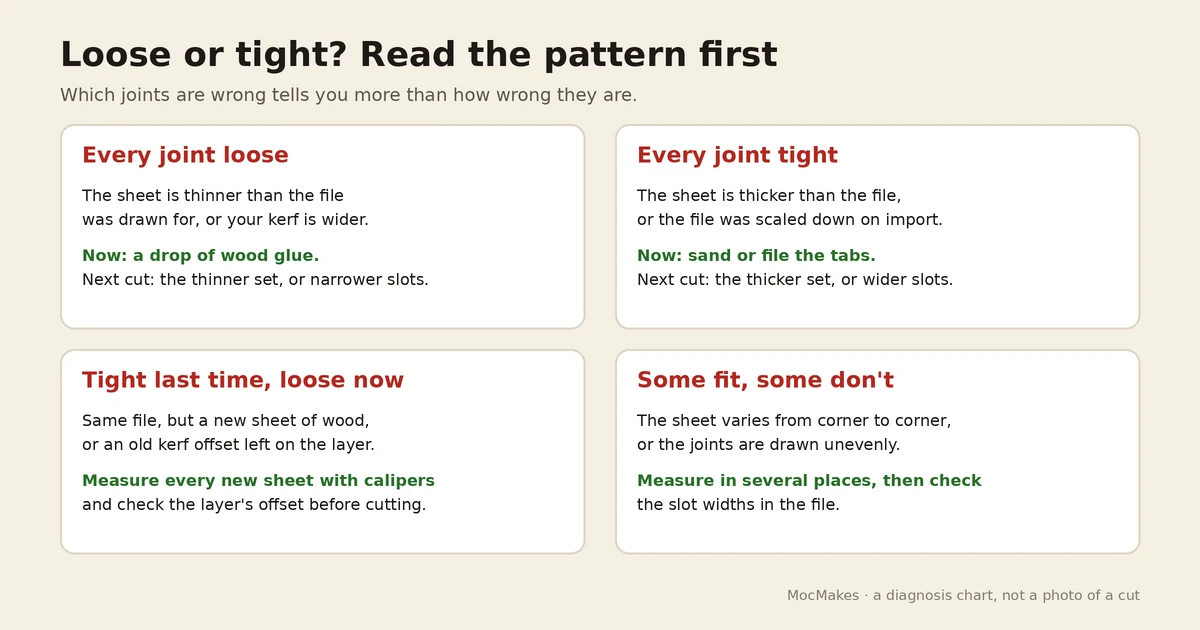
Which joints are wrong?
- Every joint loose by about the same amount. The sheet is thinner than the file was drawn for, or your kerf is wider than the designer allowed for. Glue what you have cut and fix the next cut (below).
- Every joint tight. The sheet is thicker than the file, or the whole design came in smaller than drawn: imported at the wrong scale, or shrunk to fit the bed. One forum user who scaled a box down "a little bit" to fit the work area asked whether "the joints/tabs will get tight". They do: scaling changes the slot widths along with everything else. See SVG imports at the wrong size.
- Tight one time, loose the next, with the same file. Suspect the new sheet first, then the cut layer. A kerf offset left over from an earlier job moves every cut; a regular on the LightBurn forum says that has "happened to me a few times".
- Some joints fit, some don't. Either the sheet varies across its area or the joints in the file are not drawn the same. On the Glowforge forum, one maker found that acrylic thickness "varies from corner-to-corner" whatever the source. Measure the sheet where each bad part was cut, then measure those slots in the file.
How far off is "3 mm" plywood?
Further than the label suggests. On the LightBurn forum one user writes that 3 mm plywood "rarely comes as exactly 3.00 mm – sometimes it's 2.7 mm, other times 3.2 mm"; another measured Baltic birch sold as 3 mm "all over the place from 2.49 and up". And 1/8 in, the other common "3 mm" sheet, is 3.175 mm. Those are users' own measurements, not a standard, but they show why a file drawn for one nominal size can rattle in one sheet and jam in the next.
So measure before you choose a file: calipers, three or four spots away from the edges, on the sheet you are about to cut.
Save the parts you already cut
- Too tight: take material off the tab instead of forcing it. Glowforge forum members use needle files or an emery board cut to size. Remove a little, try the fit, repeat. Sanding the slot works too; it is just harder to reach.
- Too loose: a drop of wood glue in the slot holds it. The maker with the loose houses ended up gluing his. If the model has to come apart again, recut only the slotted parts once you know the right width.
Fix the next cut
- Use the set made for your sheet, if the file has one. Our slot kits include a separate set of cut files for 3 mm and for 1/8 in (3.175 mm) sheet, and the newer kits add 4, 5 and 6 mm and 1/4 in. The README says to measure the sheet and pick the closest set.
- Resize only the slots. In LightBurn, select the parts and open Tools → Resize Slots in Selection. You enter the old and new material thickness, and it changes the slots and tabs instead of the whole drawing. Our free Slot Fit Adjuster does the same in your browser for an SVG or DXF, from your measured thickness and kerf.
- Or set a kerf offset on the cut layer. It moves every cut path, outlines included, by the same amount. How much to enter, and why you should never combine it with resized slots, is in laser kerf and slot width.
Cut two pieces before the whole kit
The cheapest fix is the one you never need. A Glowforge forum member's habit: cut "just one slotted piece and one tabbed piece to see if the fit is too loose, too tight, or just right". The buyer who asked had never thought of it.
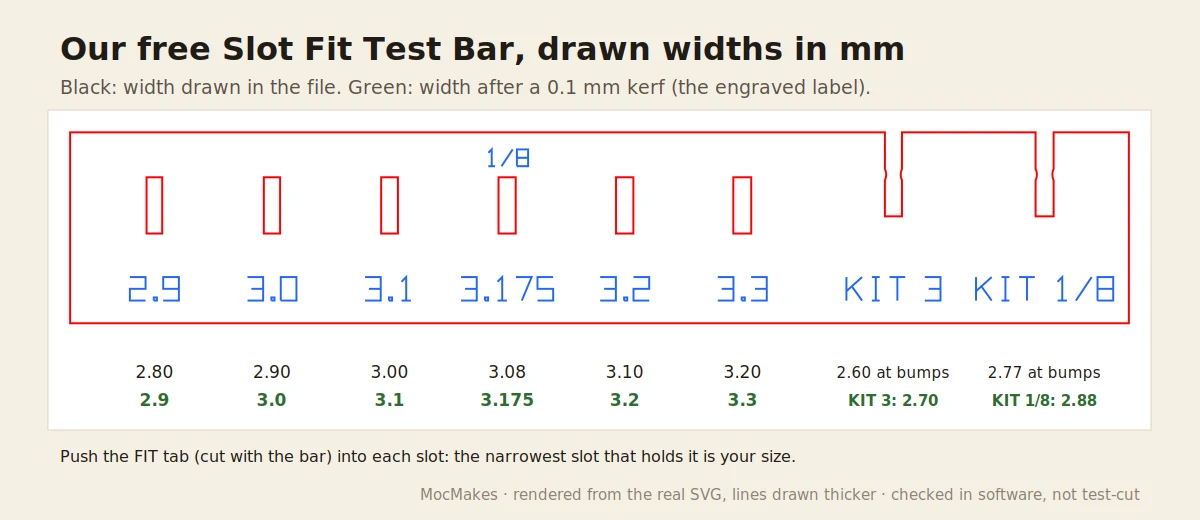
Our free Slot Fit Test Bar does this in one small cut: six slots from 2.9 to 3.3 mm (3.175 is the 1/8 in size) and a tab marked FIT, plus two slots copied from the corner joints of our kits. Cut it from the sheet you plan to use, with the settings you plan to use. The narrowest slot that takes the tab with firm finger pressure and holds the bar when you lift it is your size. It is free, needs no email, and is checked in software, not test-cut by us.
Questions
Why are my laser cut tabs bigger than the slots?
Either the sheet is thicker than the file was drawn for, or the file came in at the wrong size. One LightBurn forum user had tabs that were "always bigger than the slots" on every box file, and fixed it by changing the SVG import setting from 96 to 72 px per inch.
Should I sand the tab or the slot?
The tab, when you can: it is on the outside of the part, so it is easy to reach and easy to sand evenly. Take off a little at a time; you cannot put it back.
Should I ask the seller?
Yes, if the listing does not say which thickness and kerf the file was drawn for, or if joints in the same file disagree. On the LightBurn forum the advice was blunt: "If the seller doesn't know or can't answer then that implies there's little care in how it was made". Our kits state the sheet thickness and the kerf they are drawn for in the README. If one of ours doesn't fit as described, email us within 14 days and we fix it or refund you in full (see the shop).
Sources
- LightBurn forum, Etsy files loose fit, 27 Dec 2022 (the loose houses, the leftover kerf offset, the seller advice).
- LightBurn forum, Material thickness setting feature request, 17 Oct 2025.
- LightBurn forum, Finger joints too tight, Aug 2024.
- LightBurn forum, Scaling the SVG to fit the work area, 3 Jan 2024.
- LightBurn forum, Issues with tabs and slots on any box, 24 Oct 2023.
- Glowforge community, SVG files don't fit together when printed, Oct 2021.
- Glowforge community, Christmas tree spiral design, 17 Sep 2022 (acrylic thickness).
- LightBurn documentation, Resize Slots.